AWS DevOps & Developer Productivity Blog
Using OpsWorks to Perform Operational Tasks
Today Jeff Barr blogged about a new feature that gives users the ability to deploy and operate applications on existing Amazon EC2 instances and on-premises servers with AWS OpsWorks. You may know OpsWorks as a service that lets users deploy and manage applications. However OpsWorks can also perform operational tasks that simplify server management. This blog includes three examples of how to use OpsWorks to manage instances. This blog will create EC2 instances using OpsWorks, but you can also use the newly launched features to register on-premises servers or existing EC2 instances.
Example 1: Use OpsWorks to perform tasks on instances
Server administrators must often perform routine tasks on multiple instances, such as installing software updates. In the past you might have logged in with SSH to each instance and run the commands manually. With OpsWorks you can now perform these tasks on every instance with a single command as often as you like by using predefined scripts and Chef recipes. You can even have OpsWorks run your recipes automatically at key points in the instance’s life cycle, such as after the instance boots or when you deploy an app. This example will show how you can run a simple shell command and get the response back on the console.
Step 1: Create a stack
- Select Add a Stack to create an OpsWorks stack.
- Give it a name and select Advanced.
- Set Use custom Chef Cookbooks to Yes.
- Set Repository type to Git.
- Set the Repository URL to https://github.com/amazonwebservices/opsworks-first-cookbook
- Accept the defaults for the other settings and click the Add Stack button at the bottom of the page to create the stack.
Step 2: Add a Layer
- Select Add a Layer
- Choose a Custom layer; give it a Name and Short Name. The short name should be all lower case with no spaces or punctuation.
Step 3: Add an Instance
- Click Instances in the navigation pane and under the layer you just created click + Instance to create a new EC2 instance. You can also Register an on-premises instance in this step.
- For this walkthrough, just accept the default settings and click Add Instance to add the instance to the layer.
- Click start in the row’s Actions column and OpsWorks will then launch a new EC2 instance. The instance’s status will change to online when it’s ready.
Step 4: Run a command
This step shows how to run a command that executes one of the custom recipes that you installed earlier. It detects whether the instance is vulnerable to Shellshock.
- Click Stack
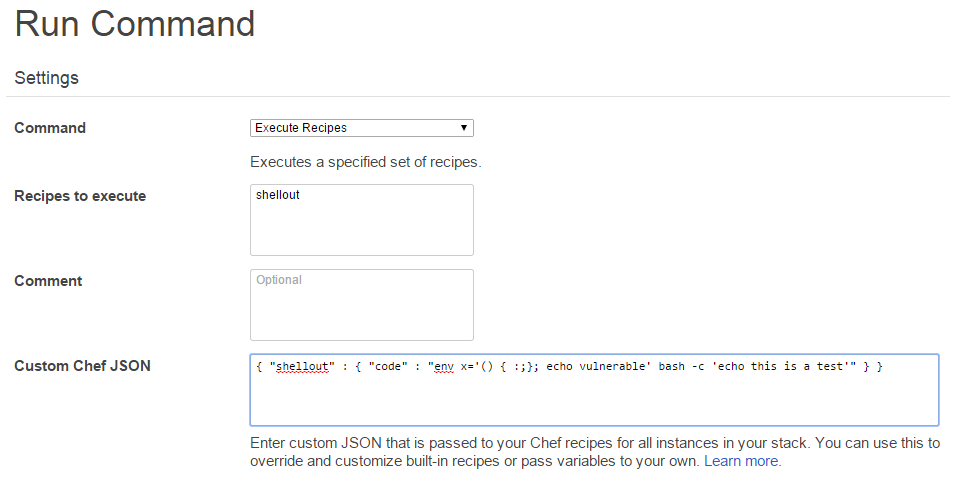
- Click Run Command
- Select “Execute Recipes” from the drop down
- Set Recipes to execute to shellout
- Select Advanced
- Copy the following to the Custom Chef JSON box:
{ "shellout" : { "code" : "env x='() { :;}; echo vulnerable' bash -c 'echo this is a test'" } } - Click Execute Recipes
[2014-12-03T23:49:03+00:00] INFO: @@@
this is a test
@@@
Next steps
It’s usually a better practice to put each script you plan to run into a Chef recipe. It improves consistency and avoids incorrect results. You can easily include Bash, Python and Ruby scripts in a recipes. For example, the following recipe is basically a wrapper for a one-line Bash script:
bash "change system greeting" do
  user "root"
  code <<-EOH
     echo "Hello OpsWorks World" > /etc/motd
  EOH
end |
Example 2: Manage operating system users and ssh/sudo access
Step 1: Import users into AWS OpsWorks
- Sign in to AWS OpsWorks as an administrative user or as the account owner.
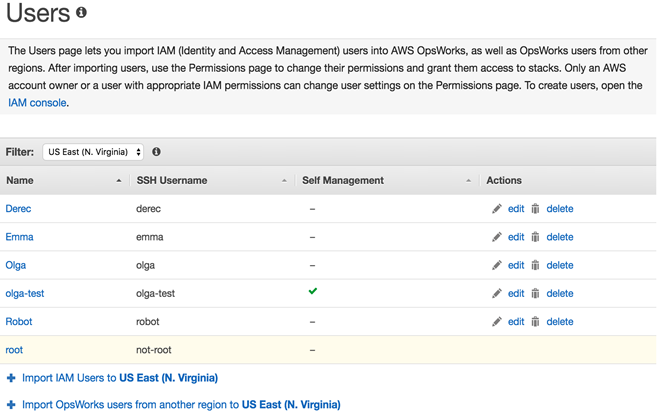
- Click Users on the upper right to open the Users page.
- Click Import IAM Users to display the users that have not yet been imported.
- Select the users you want, then click Import to OpsWorks.
Step 2: Edit user settings
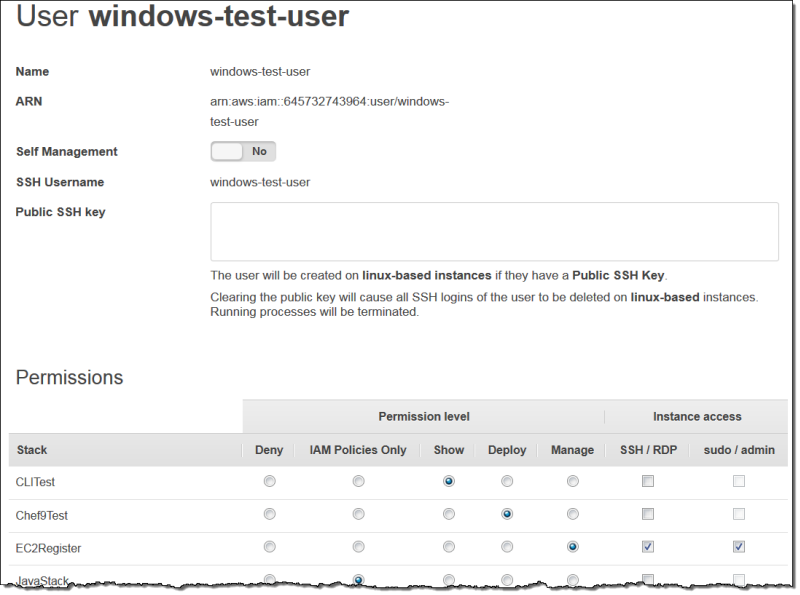
- On the Users page, click edit in the user’s Actions column.
- Enter a public SSH key for the user and give the user the corresponding private key. The public key will appear on the user’s My Settings page. For more information, see Setting an IAM User’s Public SSH Key. If you enable self-management, the user can specify his or her own key.
- Set the user’s permissions levels for the stack you created in Example 1 to include “SSH” access. You can also set permissions separately by using each stack’s Permissions page.
Step 3: SSH to the instance
- Click Dashboard on the upper right to open the Dashboard page.
- Select the stack you created in Example 1 and navigate to Instances.
- Select the instance you created in Example 1.
- In the Logs section you will see the execute_recipes command that added the user and the user’s public key to the instance. When this command has completed, as indicated by the green check, select the SSH button at the top of the screen to launch an SSH client. You can then sign into the instance with your username and private key.

Example 3: Archive a file to Amazon S3
There are times when you may want to archive a file, for example to investigate a problem later. This script will send a file from an instance to S3.
Step 1: Create or select an existing S3 bucket
Open the S3 console and create a new bucket or select an existing bucket to use for this example.
Step 2: Run a command to push a file to S3
- Using the stack you created in Example 1, navigate to Stack
- Select Run Command
- Select “Execute Recipes” from the drop down menu
- Set Recipes to execute to sample::push-s3
- Select Advanced
- Set Custom Chef JSON to
{   "s3": {
	        "filename": "opsworks-agent.log",
	        "bucketname": "your-s3-bucket-name",
	        "filepath": "/var/log/aws/opsworks/opsworks-agent.log"
	  }	}
The sample::push-s3 recipe was included in the cookbook that you installed earlier. It gets the required information from the JSON and uses the AWS Ruby SDK to upload the file to S3.
- Click Execute Recipes
Step 3: View the file in S3
The file you selected in step 2 should now be in your bucket.
These examples demonstrate three ways that OpsWorks can be used for more than software configuration. See the documentation for more information on how to manage on-premises and EC2 instances with OpsWorks.