AWS DevOps & Developer Productivity Blog
Using Amazon CloudWatch Logs with AWS OpsWorks
It is often useful to be able to store log files in a central place for easy access and reporting. Amazon CloudWatch Logs is a new service that is designed to help you monitor, store, and access your system, application, and custom log files from Amazon EC2 instances. For example, you can monitor application logs for specific literal terms (such as “NullReferenceException”) or count the number of occurrences of a literal term at a particular position in log data (such as “404” status codes in an Apache access log). When the term you are searching for is found, CloudWatch Logs reports the data to an Amazon CloudWatch metric that you specify. You can then retrieve the associated log data from CloudWatch Logs if, for example, the count of “NullReferenceExceptions” exceeds its normal range.
This blog will describe how to configure Amazon CloudWatch Logs with AWS OpsWorks.
Step 1: Create Recipes
These Chef recipes demonstrate a basic example for how to monitor one log file on each server. The recipes create a log group using the stack name and a log stream using the hostname. If you want to monitor multiple log files, you will need to extend the recipes to create multiple log groups and log streams.
First, create a repository to store your recipes. OpsWorks supports Git and Subversion, or you can store a bundle on Amazon S3. The structure of your cookbook repository is described in the
OpsWorks documentation. For your convenience, you can reference these recipes
on GitHub along with a CloudFormation template to create a sample OpsWorks stack.
The config.rb recipe creates the CloudWatch Logs configuration file:
|
template “/tmp/cwlogs.cfg” do
cookbook “logs”
source “cwlogs.cfg.erb”
owner “root”
group “root”
mode 0644
end
|
This recipe uses the cwlogs.cfg.erb template file that you can modify to specify various attributes such as what files to log:
|
[general]
# Path to the AWSLogs agent’s state file. Agent uses this file to maintain
# client side state across its executions.
state_file = /var/awslogs/state/agent-state
## Each log file is defined in its own section. The section name doesn’t
## matter as long as its unique within this file.
#
#[kern.log]
#
## Path of log file for the agent to monitor and upload.
#
#file = /var/log/kern.log
#
## Name of the destination log group.
#
#log_group_name = kern.log
#
## Name of the destination log stream.
#
#log_stream_name = {instance_id}
#
## Format specifier for timestamp parsing.
#
#datetime_format = %b %d %H:%M:%S
#
[<%= node[:opsworks][:stack][:name] %>]
datetime_format = [%Y-%m-%d %H:%M:%S]
log_group_name = <%= node[:opsworks][:stack][:name].gsub(‘ ‘,’_’) %>
file = <%= node[:cwlogs][:logfile] %>
log_stream_name = <%= node[:opsworks][:instance][:hostname] %>
|
The template file references the default.rb attributes for the file you want to log:
|
default[:cwlogs][:logfile] = ‘/var/log/aws/opsworks/opsworks-agent.log’
|
The install.rb recipe installs and starts the CloudWatch Logs agent:
|
directory “/opt/aws/cloudwatch” do
recursive true
end
remote_file “/opt/aws/cloudwatch/awslogs-agent-setup-v1.0.py” do
source “https://s3.amazonaws.com/aws-cloudwatch/downloads/awslogs-agent-setup-v1.0.py”
mode “0755”
end
execute “Install CloudWatch Logs agent” do
command “/opt/aws/cloudwatch/awslogs-agent-setup-v1.0.py -n -r us-east-1 -c /tmp/cwlogs.cfg”
not_if { system “pgrep -f aws-logs-agent-setup” }
end
|
Step 2: Extend the AWS IAM Role
To use CloudWatch logs with your OpsWorks instances, you will need to extend the IAM role used by the instances:
- Go to the IAM console
- Select the instance role used by your OpsWorks stack (the default is aws-opsworks-ec2-role; you can find the one used by your stack in the stack settings)
- Select Attach Role Policy
- Select custom policy and add a policy such as:
|
{
“Version”: “2012-10-17”,
“Statement”: [
{
“Effect”: “Allow”,
“Action”: [
“logs:CreateLogGroup”,
“logs:CreateLogStream”,
“logs:GetLogEvents”,
“logs:PutLogEvents”,
“logs:DescribeLogGroups”,
“logs:DescribeLogStreams”
],
“Resource”: [
“arn:aws:logs:us-east-1:*:*”
]
}
]
}
|
Step 3: Create an OpsWorks Stack
Now you’re ready to use these recipes with OpsWorks. Open the
OpsWorks console:
- Select Add a Stack to create an OpsWorks stack.
- Give it a name and select Advanced.
- Set Use custom Chef Cookbooks to Yes.
- Set Repository type to Git.
- Set the Repository URL to the repository where you stored the recipes created in the previous step.
- Click the Add Stack button at the bottom of the page to create the stack.
Step 4: Add a Layer
- Select Add Layer.
- Choose a layer and click Add Layer.
- Click the layer’s edit Recipes action and scroll to the Custom Chef recipes section. You will notice there are several headings—Setup, Configure, Deploy, Undeploy, and Shutdown—which correspond to OpsWorks lifecycle events. OpsWorks triggers these events at these key points in instance’s lifecycle, which runs the associated recipes.
- Enter your-cookbook::config, your-cookbook::install next to Setup, click + to add it to the list and click the Save button at the bottom to save the updated configuration. OpsWorks will then run this recipe whenever you start the instances in this layer.

Step 5: Add an Instance
The layer just controls how to configure instances. You now need to add some instances to the layer. Click
Instances in the navigation pane and under your layer, click
+ Instance. For this walkthrough, just accept the default settings and click
Add Instance to add the instance to the layer. Click
start in the row’s Actions column to start the instance. OpsWorks will then launch a new EC2 instance and configure CloudWatch Logs. The instance’s status will change to
online when it’s ready.
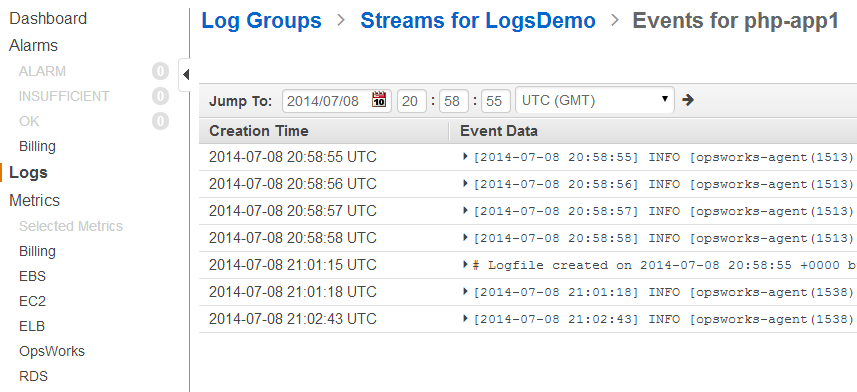
Step 6: View your Logs
Once the instance is online, go to the
CloudWatch console and select the “Logs” item in the menu. You should see your stack name displayed in the Groups column. Select your group and you will see your hostname. Select your hostname to see your log.
Summary
These instructions have demonstrated how to create a CloudWatch Logs stream with OpsWorks. Instead of manually configuring the log sources on each instance, Chef recipes consistently setup your logs. You can then monitor the logs from the AWS Management Console and create CloudWatch alarms to monitor problems. For more information about using CloudWatch Logs, including how to create CloudWatch alarms, see the
CloudWatch Logs documentation. For more information on OpsWorks, see the
OpsWorks documentation.