AWS Big Data Blog
Running R on AWS
Many AWS customers already use the popular open-source statistic software R for big data analytics and data science. Other customers have asked for instructions and best practices for running R on AWS. Several months ago, I (Markus) wrote a post showing you how to connect R with Amazon EMR, install RStudio on the Hadoop master node, and use R packages such as rmr2 or plyrmr to analyze a huge public weather dataset. In this post, we show you how to install and run R, RStudio Server, and Shiny Server on Amazon EC2.
You may also be interested in reading the following blog posts:
- Running R on Amazon Athena
- Using R with Amazon SageMaker
- Predict Billboard Top 10 Hits Using RStudio, H2O and Amazon Athena
RStudio and Shiny
RStudio is a popular IDE, licensed either commercially or under AGPLv3, for working with R. This is ideal if you don’t want to connect to a server via SSH and use code editors such as vim to do analytics. RStudio is available in a desktop version, or a server version that allows you to access R via a web browser.
After you’ve analyzed your results, you may want to visualize them. Shiny is a great R package, licensed either commercially or under AGPLv3, that you can use to create interactive dashboards. Shiny provides a web application framework for R. It turns your analyses into interactive web applications; no HTML, CSS, or JavaScript knowledge required. Shiny Server can deliver your R visualization to your customers via a web browser and execute R functions, including database queries, in the background.
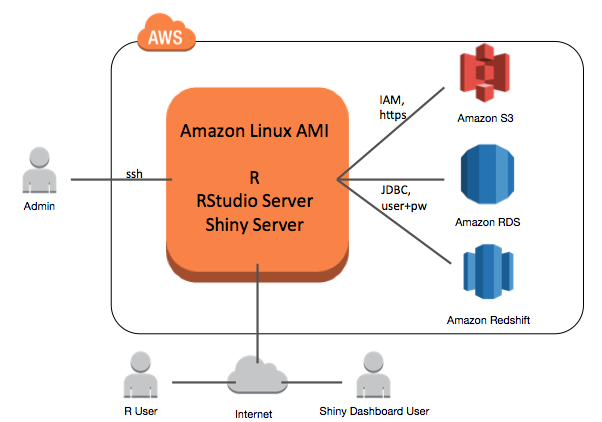
RStudio can be used to analyze large datasets, such as the CCAFS-Climate Data, a 6-TB dataset with high-resolution climate data available through our Open Data program, to assess the impacts of climate change, primarily on agriculture. The architecture below shows how RStudio on EC2 interacts with other AWS services.
Starting a server on AWS—called an EC2 instance—is easy with the Getting Started instructions. The first step is to launch an Amazon EC2 instance. In this post, we are going to focus on five of the launch steps that impact your R-based analysis environment on AWS:
- Choosing an Amazon Machine Image
- Choosing an instance type
- Configuring instance details: EC2 user data
- Configuring instance details: IAM roles
- Configuring a security group
After that, we show you how to load data into your R-based environment, analyze data located on Amazon S3, and configure Shiny Server. We conclude by wrapping up these concepts in an AWS CloudFormation template to simplify deployment. If you want to skip ahead to the CloudFormation template, click here.
Choosing an AMI for R
When launching an EC2 instance, you must choose an Amazon Machine Image (AMI), which contains all information required to start an instance. For example, an AMI defines which operating system is installed on your EC2 instance and which software is included.
You can choose the Amazon Linux AMI, which is provided at no additional cost and has a stable version of R in the repository. This AMI is maintained by AWS and includes packages and configurations that provide native integration with AWS and other software.
Choosing an Instance Type for R
Choose an EC2 instance type that matches the data size and processing that your analysis requires. By default, R runs only on one core node and, in many cases, requires a lot of memory.
For programming and development, the general-purpose T2 instance types are sufficient and cheap, and t2.micro is available through the AWS Free Tier. If you don’t know what instance type to choose, start with t2.medium.
The M4 instance family is often a good choice for R workloads. If you use R packages such as foreach, parallel, or snow to parallelize, we recommend using the bigger M4 instance types. They provide a good mix of CPU power and memory.
To connect R to GPU hardware, you can choose the G2/3 or P2 instance families, to leverage packages like gputools. The following table, while a non-exhaustive list, is a good representation of how you might choose your instance types.

AWS provides more details about instance types. An advantage of using AWS is that you aren’t locked into the instance type that you originally choose. You can change your instance type in minutes: just stop your instance, change the instance type, and start the instance again.
RStudio Server lets you share your R-based analysis server with several other scientists. Provision a Linux user for each scientist, and several scientists can work on the same machine. Every user requires at least one CPU and some memory. For multiuser activities, use at least an m4.2xlarge instance type.
Configuring instance details: EC2 user data
When you launch an EC2 instance, you can pass in user data that can be used to perform common automated configuration tasks. The tasks can even run scripts for installation after the instance starts. In the EC2 launch wizard, you can add this at the Configure Instance Details step by expanding the Advanced Details pane:
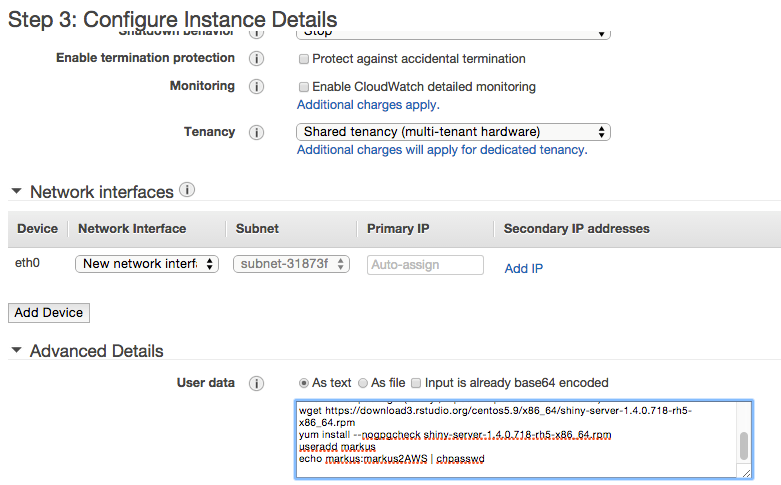
Before running the following script to install R, RStudio Server, the Shiny package, and Shiny Server, visit https://www.rstudio.com/products/rstudio/download-server/ to check for the latest versions of RStudio Server. Modify the script to download and install the most recent version. This script also adds a user and password that you use for logging in later to RStudio.
Change the user name and password based on your requirements, and check for the latest RStudio Server and Shiny Server versions. For a multiuser environment, you can also add additional users at this point.
Configuring instance details: IAM roles
On the same configuration page, you can add an AWS Identity and Access Management (IAM) role to your EC2 instance.

IAM roles allow your applications—in this case, R—to make API requests securely. You can access AWS services from your EC2 instances without managing AWS security credentials.
For your R-based data science environment, make sure that your EC2 instance has permission to read data from the desired S3 bucket. According to the principle of least privilege, applications should only be able to read the S3 files that they must execute. The following IAM policy demonstrates how the role rstats is given privileges to read files from your S3 bucket, which in this case is rstatsdata.
Configuring the security group
In the EC2 launch wizard, you define a security group, which acts as a virtual firewall that controls the traffic for one or more instances. For your R-based analysis environment, you have to open up port 8787 for RStudio Server and port 3838 for Shiny Server.
After you finish your security group configuration, choose Create to launch your instance.
Loading data into your R-based environment on AWS
After your EC2 instance is running, you can connect using a web browser to RStudio Server and R. For login credentials, use the newly created user and password. The URL looks like the following:
http://ec2-YOUR-IP.compute-1.amazonaws.com:8787
You can find more details about your public DNS in the EC2 console. To change your Linux user password using RStudio, choose Tools, Shell, and type the Linux command passwd.
You can do most of your work using RStudio Server, but in some cases you might have to log in to your EC2 instance via SSH. For example, some R packages require installed Linux packages. For the next steps, install the curl-devel Linux package so that you can use the R package “RCurl”. Connect to your EC2 instance via SSH and execute the following command:
Now that the underlying R server is set up, load data and obtain the R code to analyze.
Git is a popular code versioning system. GitHub and AWS CodeCommit provide managed Git services, and RStudio integrates well with different services. We recommend that you put your code in a Git repository so that you can share your code with colleagues, move code from your laptop to AWS, and track your changes.
Storing data in S3
Amazon S3 is secure, durable, highly scalable object storage. It is easy to use, with a simple web service interface to store and retrieve any amount of data from anywhere on the web. It’s easy to get started with S3.
Move your data to S3 for analysis, copy the data via the AWS CLI to your EC2 instance, and read the data into R. If you make your S3 object permission “Everyone”, you can read the object directly into R using the RCurl package. You can also enable fine-grained permissions by specifying the appropriate read permissions in the previous IAM policy that you generated. In the following example, we read from the CGIAR S3 bucket, which is publicly accessible as part of our public data sets program.
In this case, you are reading data from CCAFS-Climate Data, and showing the head of the data frame.
Configuring Shiny Server
To use Shiny Server, you have to make some small configuration changes. Connect to your EC2 instance and run the following commands (you can also add this to the previous user data script):
This configuration lets system users host their own applications by creating a /ShinyApps folder in their home directory. For help configuring Shiny Server, see the Quick Start section of the Shiny Server Professional Administrator’s Guide.
By default, Shiny Server listens on port 3838, so your new application is available at the following URL, where <your_username> is your Linux user name:
http://ec2-YOUR-IP.compute-1.amazonaws.com:3838/<your_username>/hello
Now you can create your Shiny dashboards and deploy them via your ShinyApps folder. For advice on creating a Shiny dashboard, see the Teach Yourself Shiny tutorial. In the previous bash script, you also copied in an example, so if you were to navigate to the previously mentioned URL you should see something similar to the following:
To lower costs, stop your EC2 instance when you’re not using it. Starting the instance takes less than five minutes. Consider stopping rather than terminating, because terminating can delete all data and code located on the instance.
Automating deployment
Now that you have gone through the preceding steps, here’s an AWS CloudFormation template so that you can quickly and easily deploy this infrastructure in your own environment.
![]()
This CloudFormation template takes in several parameters that you can modify as you see fit. The following parameters might have defaults included, but you can modify them (such as using different RStudio versions, or artifact hosting locations).
- InstanceType: The EC2 instance type on which to deploy the RStudio and Shiny server. The template currently accepts all instances in the t2, m4, c4, r4, g2, p2, and g3 instance families, but can incorporate other instance families easily.
- ImageId: The AMI ID for the instance that you spin up. Currently, it defaults to 2017.03.01. Over time, newer versions of this AMI are released, so you can update as desired.
- InitialUser and InitialPassword: The user name and password specified in a previous section for the initial RStudio user.
- VpcId and SubnetId: The VPC and subnet in which to launch the instance. The subnet should exist within the specified VPC.
- RStatsS3Bucket: The S3 bucket that you read from and write to.
When you deploy the CloudFormation template, it sets up the resources that you would otherwise configure manually. The EC2 instance is configured with the user data script described earlier and configures both RStudio Server and Shiny Server. When the CloudFormation stack is finished, get the EC2 instance URL, as well as the URLs for RStudio Server and Shiny Server, by choosing Outputs.
Summary
With AWS, you can easily provision a server with up to 3,904 GB of memory and up to 128 vCPUs. You’ll have no more limitations of hardware and computation time for your R-based analyses. The Amazon Linux AMI is a good starting point for setting up your own analysis environment. You can change your instance types in minutes and optimize your infrastructure based on your requirements.
Furthermore, there are many R packages, such as RJDBC or dplyr, which you can use to connect to all AWS big data services. AWS provides efficient, scaling infrastructure for installing R, RStudio Server, and Shiny Server for data analysis.
If you’re interested in learning more about R and AWS, we recommend the following posts as excellent primers:
If you have questions or suggestions, please leave a comment below.
This post was updated October 12, 2017.
Additional Reading
About the Authors
(Original Post) Markus Schmidberger is a Senior Big Data Consultant for AWS Professional Services.
(October 2017 Update) Aaron Friedman is a Healthcare and Life Sciences Partner Solutions Architect with AWS.