AWS Security Blog
How to add DNS filtering to your NAT instance with Squid
September 23, 2020: The squid configuration file in this blog post and associated YAML template have been updated.
September 4, 2019: We’ve updated this blog post, initially published on January 26, 2016. Major changes include: support of Amazon Linux 2, no longer having to compile Squid 3.5, and a high availability version of the solution across two availability zones.
Amazon Virtual Private Cloud (Amazon VPC) enables you to launch AWS resources on a virtual private network that you’ve defined. On an Amazon VPC, many people use network address translation (NAT) instances and NAT gateways to enable instances in a private subnet to initiate outbound traffic to the Internet, while preventing the instances from receiving inbound traffic initiated by someone on the Internet.
For security and compliance purposes, you might have to filter the requests initiated by these instances (also known as “egress filtering”). Using iptables rules, you could restrict outbound traffic with your NAT instance based on a predefined destination port or IP address. However, you might need to enforce more complex security policies, such as allowing requests to AWS endpoints only, or blocking fraudulent websites, which you can’t easily achieve by using iptables rules.
In this post, I discuss and give an example of how to use Squid, a leading open-source proxy, to implement a “transparent proxy” that can restrict both HTTP and HTTPS outbound traffic to a given set of Internet domains, while being fully transparent for instances in the private subnet.
The solution architecture
In this section, I present the architecture of the high availability NAT solution and explain how to configure Squid to filter traffic transparently. Later in this post, I’ll provide instructions about how to implement and test the solution.
The following diagram illustrates how the components in this process interact with each other. Squid Instance 1 intercepts HTTP/S requests sent by instances in Private Subnet 1, including the Testing Instance. Squid Instance 1 then initiates a connection with the destination host on behalf of the Testing Instance, which goes through the Internet gateway. This solution spans two Availability Zones, with Squid Instance 2 intercepting requests sent from the other Availability Zone. Note that you may adapt the solution to span additional Availability Zones.
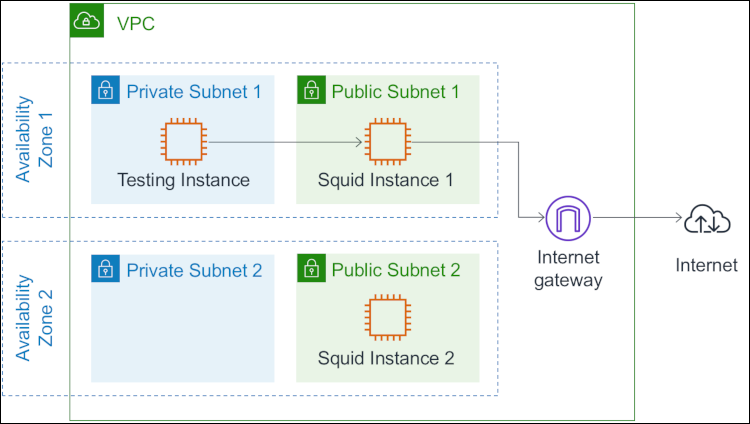
Figure 1: The solution spans two Availability Zones
Intercepting and filtering traffic
In each availability zone, the route table associated to the private subnet sends the outbound traffic to the Squid instance (see Route Tables for a NAT Device). Squid intercepts the requested domain, then applies the following filtering policy:
- For HTTP requests, Squid retrieves the host header field included in all HTTP/1.1 request messages. This specifies the Internet host being requested.
- For HTTPS requests, the HTTP traffic is encapsulated in a TLS connection between the instance in the private subnet and the remote host. Squid cannot retrieve the host header field because the header is encrypted. A feature called SslBump would allow Squid to decrypt the traffic, but this would not be transparent for the client because the certificate would be considered invalid in most cases. The feature I use instead, called SslPeekAndSplice, retrieves the Server Name Indication (SNI) from the TLS initiation. The SNI contains the requested Internet host. As a result, Squid can make filtering decisions without decrypting the HTTPS traffic.
Note 1: Some older client-side software stacks do not support SNI. Here are the minimum versions of some important stacks and programming languages that support SNI: Python 2.7.9 and 3.2, Java 7 JSSE, wget 1.14, OpenSSL 0.9.8j, cURL 7.18.1
Note 2: TLS 1.3 introduced an optional extension that allows the client to encrypt the SNI, which may prevent Squid from intercepting the requested domain.
The SslPeekAndSplice feature was introduced in Squid 3.5 and is implemented in the same Squid module as SslBump. To enable this module, Squid requires that you provide a certificate, though it will not be used to decode HTTPS traffic. The solution creates a certificate using OpenSSL.
The following code shows the Squid configuration file. For HTTPS traffic, note the ssl_bump directives instructing Squid to “peek” (retrieve the SNI) and then “splice” (become a TCP tunnel without decoding) or “terminate” the connection depending on the requested host.
The text file located at /etc/squid/whitelist.txt contains the list of whitelisted domains, with one domain per line. In this blog post, I’ll show you how to configure Squid to allow requests to *.amazonaws.com, which corresponds to AWS endpoints. Note that you can restrict access to a specific set of AWS services that you’ve defined (see Regions and Endpoints for a detailed list of endpoints), or you can set your own list of domains.
Note: An alternate approach is to use VPC endpoints to privately connect your VPC to supported AWS services without requiring access over the Internet (see VPC Endpoints). Some supported AWS services allow you to create a policy that controls the use of the endpoint to access AWS resources (see VPC Endpoint Policies, and VPC Endpoints for a list of supported services).
You may have noticed that Squid listens on port 3129 for HTTP traffic and 3130 for HTTPS. Because Squid cannot directly listen to 80 and 443, you have to redirect the incoming requests from instances in the private subnets to the Squid ports using iptables. You do not have to enable IP forwarding or add any FORWARD rule, as you would do with a standard NAT instance.
The solution stores the files squid.conf and whitelist.txt in an Amazon Simple Storage Service (S3) bucket and runs the following script every minute on the Squid instances to download and update the Squid configuration from S3. This makes it easy to maintain the Squid configuration from a central location. Note that it first validates the files with squid -k parse and then reload the configuration with squid -k reconfigure if no error was found.
The solution then uses the CloudWatch Agent on the Squid instances to collect and store Squid logs in Amazon CloudWatch Logs. The log group /filtering-nat-instance/cache.log contains the error and debug messages that Squid generates and /filtering-nat-instance/access.log contains the access logs.
An access log record is a space-delimited string that has the following format:
<time> <response_time> <client_ip> <status_code> <size> <method> <url> <sni> <remote_host> <mime>
The following table describes the fields of an access log record.
| Field | Description |
| time | Request time in seconds since epoch |
| response_time | Response time in milliseconds |
| client_ip | Client source IP address |
| status_code | Squid request status and HTTP response code sent to the client. For example, a HTTP request to an unallowed domain logs TCP_DENIED/403, and a HTTPS request to a whitelisted domain logs TCP_TUNNEL/200 |
| size | Total size of the response sent to client |
| method | Request method like GET or POST. |
| url | Request URL received from the client. Logged for HTTP requests only |
| sni | Domain name intercepted in the SNI. Logged for HTTPS requests only |
| remote_host | Squid hierarchy status and remote host IP address |
| mime | MIME content type. Logged for HTTP requests only |
The following are some examples of access log records:
Designing a high availability solution
The Squid instances introduce a single point of failure for the private subnets. If a Squid instance fails, the instances in its associated private subnet cannot send outbound traffic anymore. The following diagram illustrates the architecture that I propose to address this situation within an Availability Zone.
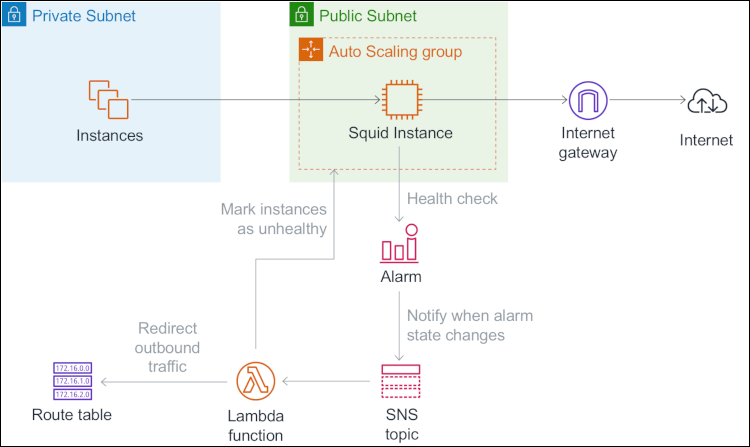
Figure 2: The architecture to address if a Squid instance fails within an Availability Zone
Each Squid instance is launched in an Amazon EC2 Auto Scaling group that has a minimum size and a maximum size of one instance. A shell script is run at startup to configure the instances. That includes installing and configuring Squid (see Running Commands on Your Linux Instance at Launch).
The solution uses the CloudWatch Agent and its procstat plugin to collect the CPU usage of the Squid process every 10 seconds. For each Squid instance, the solution creates a CloudWatch alarm that watches this custom metric and goes to an ALARM state when a data point is missing. This can happen, for example, when Squid crashes or the Squid instance fails. Note that for my use case, I consider watching the Squid process a sufficient approach to determining the health status of a Squid instance, although it cannot detect eventual cases of the Squid process being alive but unable to forward traffic. As a workaround, you can use an end-to-end monitoring approach, like using witness instances in the private subnets to send test requests at regular intervals and collect the custom metric.
When an alarm goes to ALARM state, CloudWatch sends a notification to an Amazon Simple Notification Service (SNS) topic which then triggers an AWS Lambda function. The Lambda function marks the Squid instance as unhealthy in its Auto Scaling group, retrieves the list of healthy Squid instances based on the state of other CloudWatch alarms, and updates the route tables that currently route traffic to the unhealthy Squid instance to instead route traffic to the first available healthy Squid instance. While the Auto Scaling group automatically replaces the unhealthy Squid instance, private instances can send outbound traffic through the Squid instance in the other Availability Zone.
When the CloudWatch agent starts collecting the custom metric again on the replacement Squid instance, the alarm reverts to OK state. Similarly, CloudWatch sends a notification to the SNS topic, which then triggers the Lambda function. The Lambda function completes the lifecycle action (see Amazon EC2 Auto Scaling Lifecycle Hooks) to indicate that the replacement instance is ready to serve traffic, and updates the route table associated to the private subnet in the same availability zone to route traffic to the replacement instance.
Implementing and testing the solution
Now that you understand the architecture behind this solution, you can follow the instructions in this section to implement and test the solution in your AWS account.
Implementing the solution
First, you’ll use AWS CloudFormation to provision the required resources. Select the Launch Stack button below to open the CloudFormation console and create a stack from the template. Then, follow the on-screen instructions.
![]()
CloudFormation will create the following resources:
- An Amazon Virtual Private Cloud (Amazon VPC) with an internet gateway attached.
- Two public subnets and two private subnets on the Amazon VPC.
- Three route tables. The first route table is associated to the public subnets to make them publicly accessible. The other two route tables are associated to the private subnets.
- An S3 bucket to store the Squid configuration files, and two Lambda-based custom resources to add the files squid.conf and whitelist.txt to this bucket.
- An IAM role to grant the Squid instances permissions to read from the S3 bucket and use the CloudWatch agent.
- A security group to allow HTTP and HTTPS traffic from instances in the private subnets.
- A launch configuration to specify the template of Squid instances. That includes commands to run at startup for automating the initial configuration.
- Two Auto Scaling groups that use this launch configuration to launch the Squid instances.
- A Lambda function to redirect the outbound traffic and recover a Squid instance when it fails.
- Two CloudWatch alarms to watch the custom metric sent by Squid instances and trigger the Lambda function when the health status of Squid instances changes.
- An EC2 instance in the first private subnet to test the solution, and an IAM role to grant this instance permissions to use the SSM agent. Session Manager, which I introduce in the next paragraph, uses this SSM agent (see Working with SSM Agent)
Testing the solution
After the stack creation has completed (it can take up to 10 minutes), connect onto the Testing Instance using Session Manager, a capability of AWS Systems Manager that lets you manage instances through an interactive shell without the need to open an SSH port:
- Open the AWS Systems Manager console.
- In the navigation pane, choose Session Manager.
- Choose Start Session.
- For Target instances, choose the option button to the left of Testing Instance.
- Choose Start Session.
Note: Session Manager makes calls to several AWS endpoints (see Working with SSM Agent). If you prefer to restrict access to a defined set of AWS services, make sure to whitelist the associated domains.
After the connection is made, you can test the solution with the following commands. Only the last three requests should return a valid response, because Squid allows traffic to *.amazonaws.com only.
To find the requests you just made in the access logs, here’s how to browse the Squid logs in Amazon CloudWatch Logs:
- Open the Amazon CloudWatch console.
- In the navigation pane, choose Logs.
- For Log Groups, choose the log group /filtering-nat-instance/access.log.
- Choose Search Log Group to view and search log records.
To test how the solution behaves when a Squid instance fails, you can terminate one of the Squid instances manually in the Amazon EC2 console. Then, watch the CloudWatch alarm change its state in the Amazon CloudWatch console, or watch the solution change the default route of the impacted route table in the Amazon VPC console.
You can now delete the CloudFormation stack to clean up the resources that were just created.
Discussion: Transparent or forward proxy?
The solution that I describe in this blog is fully transparent for instances in the private subnets, which means that instances don’t need to be aware of the proxy and can make requests as if they were behind a standard NAT instance. An alternate solution is to deploy a forward proxy in your Amazon VPC and configure instances in private subnets to use it (see the blog post How to set up an outbound VPC proxy with domain whitelisting and content filtering for an example). In this section, I discuss some of the differences between the two solutions.
Supportability
A major drawback with forward proxies is that the proxy must be explicitly configured on every instance within the private subnets. For example, you can configure the HTTP_PROXY and HTTPS_PROXY environment variables on Linux instances, but some applications or services, like yum, require their own proxy configuration, or don’t support proxy usage. Note also that some AWS services and features, like Amazon EMR or Amazon SageMaker notebook instances, don’t support using a forward proxy at the time of this post. However, with TLS 1.3, a forward proxy is the only option to restrict outbound traffic if the SNI is encrypted.
Scalability
Deploying a forward proxy on AWS usually consists of a load balancer distributing traffic to a set of proxy instances launched in an Auto Scaling group. Proxy instances can be launched or terminated dynamically depending on the demand (also known as “horizontal scaling”). With forward proxies, each route table can route traffic to a single instance at a time, and changing the type of the instance is the only way to increase or decrease the capacity (also known as “vertical scaling”).
The solution I present in this post does not dynamically adapt the instance type of the Squid instances based on the demand. However, you might consider a mechanism in which the traffic from a private subnet is temporarily redirected through another Availability Zone while the Squid instance is being relaunched by Auto Scaling with a smaller or larger instance type.
Mutualization
Deploying a centralized proxy solution and using it across multiple VPCs is a way of reducing cost and operational complexity.
With a forward proxy, instances in private subnets send IP packets to the proxy load balancer. Therefore, sharing a forward proxy across multiple VPCs only requires connectivity between the “instance VPCs” and a proxy VPC that has VPC Peering or equivalent capabilities.
With a transparent proxy, instances in private subnets sends IP packets to the remote host. VPC Peering does not support transitive routing (see Unsupported VPC Peering Configurations) and cannot be used to share a transparent proxy across multiple VPCs. However, you can now use an AWS Transit Gateway that acts as a network transit hub to share a transparent proxy across multiple VPCs. I give an example in the next section.
Sharing the solution across multiple VPCs using AWS Transit Gateway
In this section, I give an example of how to share a transparent proxy across multiple VPCs using AWS Transit Gateway. The architecture is illustrated in the following diagram. For the sake of simplicity, the diagram does not include Availability Zones.
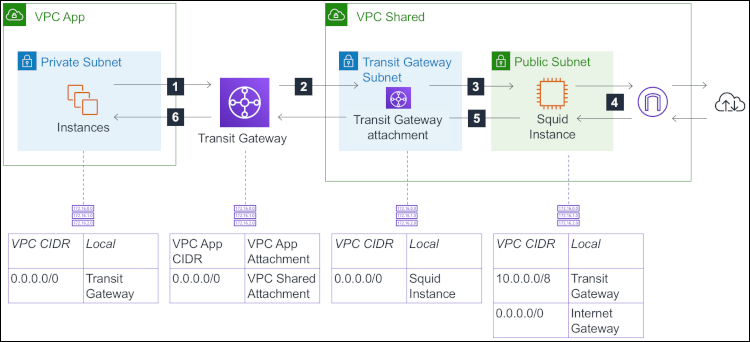
Figure 3: The architecture for a transparent proxy across multiple VPCs using AWS Transit Gateway
Here’s how instances in the private subnet of “VPC App” can make requests via the shared transparent proxy in “VPC Shared:”
- When instances in VPC App make HTTP/S requests, the network packets they send have the public IP address of the remote host as the destination address. These packets are forwarded to the transit gateway, based on the route table associated to the private subnet.
- The transit gateway receives the packets and forwards them to VPC Shared, based on the default route of the transit gateway route table.
- Note that the transit gateway attachment resides in the transit gateway subnet. When the packets arrive in VPC Shared, they are forwarded to the Squid instance because the next destination has been determined based on the route table associated to the transit gateway subnet.
- The Squid instance makes requests on behalf of the source instance (“Instances” in the schema). Then, it sends the response to the source instance. The packets that it emits have the IP address of the source instance as the destination address and are forwarded to the transit gateway according to the route table associated to the public subnet.
- The transit gateway receives and forwards the response packets to VPC App.
- Finally, the response reaches the source instance.
In a high availability deployment, you could have one transit gateway subnet per Availability Zone that sends traffic to the Squid instance that resides in the same Availability Zone, or to the Squid instance in another Availability Zone if the instance in the same Availability Zone fails.
You could also use AWS Transit Gateway to implement a transparent proxy solution that scales horizontally. This allows you to add or remove proxy instances based on the demand, instead of changing the instance type. With this approach, you must deploy a fleet of proxy instances – launched by an Auto Scaling group, for example – and mount a VPN connection between each instance and the transit gateway. The proxy instances need to support ECMP (“Equal Cost Multipath routing”; see Transit Gateways) to equally spread the outbound traffic between instances. I don’t describe this alternative architecture further in this blog post.
Conclusion
In this post, I’ve shown how you can use Squid to implement a high availability solution that filters outgoing traffic to the Internet and helps meet your security and compliance needs, while being fully transparent for the back-end instances in your VPC. I’ve also discussed the key differences between transparent proxies and forward proxies. Finally, I gave an example of how to share a transparent proxy solution across multiple VPCs using AWS Transit Gateway.
If you have any questions or suggestions, please leave a comment below or on the Amazon VPC forum.
If you have feedback about this blog post, submit comments in the Comments section below.
Want more AWS Security news? Follow us on Twitter.