AWS DevOps Blog
Using OpsWorks to Configure EC2 instances
A key OpsWorks benefit is the ability to perform actions on EC2 instances in an automated and predictable manner, such as installing software, configuring RAID arrays, and managing users. Whereas in the past you might have run commands on your instance via SSH, you can now perform these tasks by using predefined scripts (called recipes) that can be run remotely as often as you like. You can even have OpsWorks run your recipes automatically at key points in the instance’s life cycle, such as after the instance boots or when you deploy an app. Why would you want to do this?
- Consistency: Each time you call a recipe, it performs the same sequence of operations. For example, if your recipe creates a configuration file for an app server, it will create the same one for each instance.
- Automation: You can have OpsWorks automatically run your recipes to perform tasks on dozens or hundreds of instances with no more effort than for one.
- Security: Instead of allowing SSH access to your instances, which is hard to control, you specify who can run recipes, and the recipes specify what will be performed.
- Dynamic configuration: You can have recipes run in response to system events, allowing your environment to automatically respond to changes such as server scaling.
To demonstrate the benefits of using recipes to configure and control your environment, we’ve created a sample cookbook repository and recipe templates for some basic but useful tasks. To get started, go to
https://github.com/amazonwebservices/opsworks-first-cookbook and fork the cookbook to your own repository.If you don’t already have a GitHub account, go ahead and create one.

There are three recipes in this repository; once you fork it you can add more to your own repo!
- pass-data.rb – Creates a data file on your instance that you can use, for example, to pass configuration information such as a database connection string to an application. This is an example of how you can use recipes to consistently configure anything you want.
- aws-sdk.rb – Uses the AWS SDK to create an SNS topic. This is an example of how to automate actions – calling the AWS SDK in this example, but it could modified to run any arbitrary script.
- bash.rb – Changes the Linux message of the day. This is an example of how your recipes can run simple Bash scripts that can securely let users perform trusted actions without giving them broad SSH access.
The pass-data.rb recipe
To get started, open the
AWS Management Console. Your first task is to create a stack:
- Select Add a Stack to create an OpsWorks stack.
- Give it a name and select Advanced.
- Set Use custom Chef Cookbooks to Yes.
- Set Repository type to Git.
- Set the Repository URL to your forked repository (e.g., https://github.com/amazonwebservices/opsworks-first-cookbook).
Then format the data you want to send to the instances as a JSON object and add it to the Custom Chef JSON box. For example:
{
  "my_app_data": {
    "app1": {
      "name": "database_name",
      "host": "www.amazon.com",
      "password": "123"
    }
}} |
Your
Add Stack page should look something like:
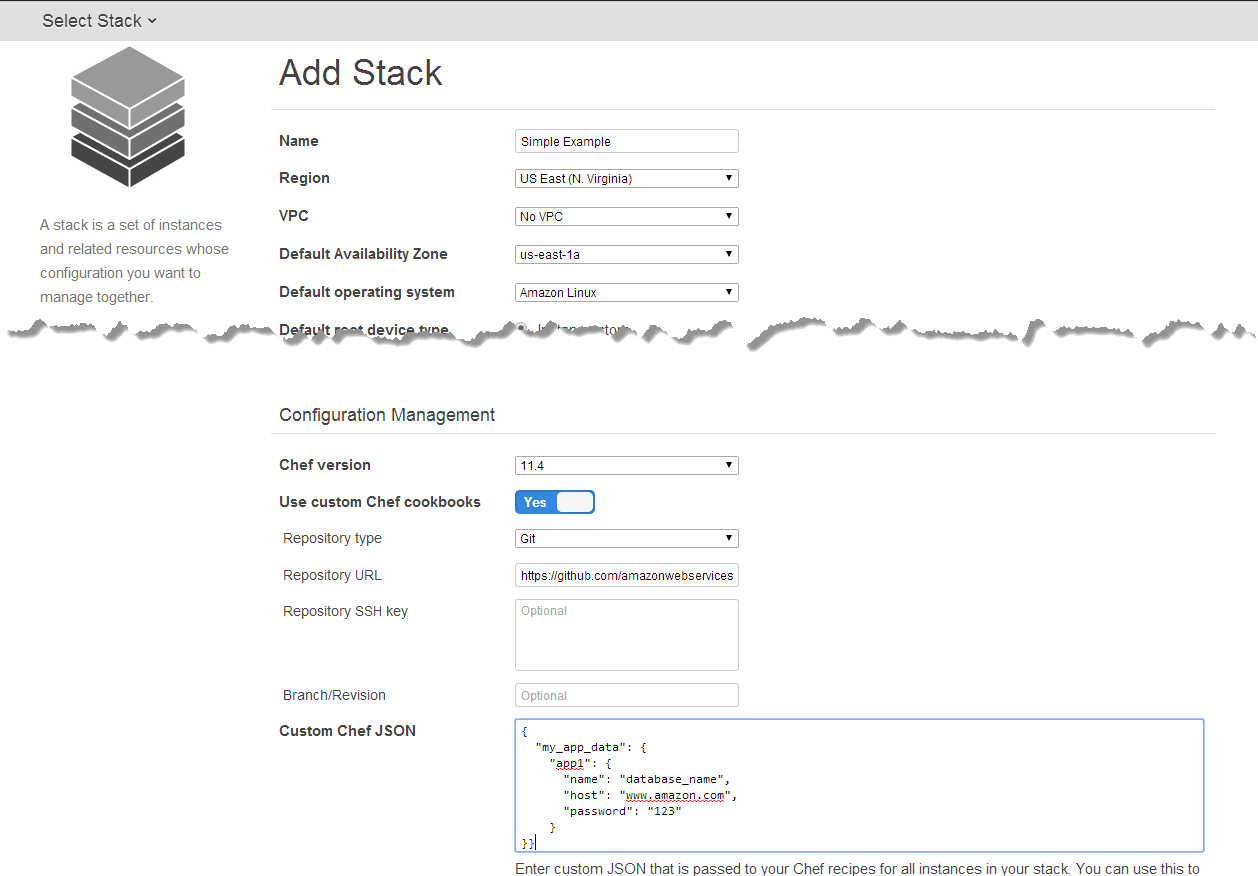
Click the
Add Stack button at the bottom of the page to create the stack.
Add a Layer
An OpsWorks layer specifies how to configure a related set of EC2 instances. For this example:
- Select Add a Layer
- Choose the Node.js App Server layer and click Add Layer
- Click the layer’s edit action and scroll to the Custom Chef recipes section. You will notice there are several headings—Setup, Configure, Deploy, Undeploy, and Shutdown—which correspond to OpsWorks lifecycle events. OpsWorks triggers these events at these key points in the instance’s lifecycle, which runs the associated recipes.
- Enter sample::pass-data next to Deploy, click + to add it to the list and click the Save button at the bottom to save the updated configuration. OpsWorks will then run this recipe whenever you deploy your app to the instances in the Node.js App Server layer.
Add an Instance
The layer just controls how to configure instances. You now need to add some instances to the layer. Click
Instances in the navigation pane and under Node.js App Server, click
+ Instance. For this walkthrough, just accept the default settings and click
Add Instance to add the instance to the layer. Go to nodejs-app1 under Node.js App Server and click
start in the row’s Actions column to start the instance. OpsWorks will then launch a new EC2 instance and configure it as a Node.js application server. The instance’s status will change to online when it’s ready.
Add an App
To have the Node.js application server do anything interesting, you need to add and deploy an app. We have one for you that reads the data that pass-data.rb installs on the instance and displays it on a web page.
First, create a new repository for your app code (for example, on GitHub) and add these two files:
package.json
{
  "name": "hello-world",
  "description": "hello world test app",
  "version": "0.0.1",
  "private": true,
  "dependencies": {
    "express": "3.4.4"
  }
} |
server.js
var express = require('express');
var app = express();

app.get('/', function(req, res) {
    res.setHeader('Content-Type', 'text/plain');
    res.sendfile('/srv/www/app1/shared/config/app_data.yml');
});

app.use(express.static('public'));

app.listen(80);
console.log('Listening on port 80'); |
In the navigation pane, click
Apps and , click
+ App, and configure the app as follows:
- Name: The app’s name, which needs to match the name specified in the custom JSON you entered on the stack earlier. Enter app1.
- App type: The app’s type, which determines where to deploy the app. The example uses Node.js, which deploys the app to Node.js App Server instances.
- Repository type: The app’s repository type.
- Repository URL: The app’s repository URL.
You now need to deploy the app. This triggers the Deploy lifecycle event, which runs the recipes that install the app’s code on the server and also runs the
pass-data.rb recipe to install your data file. After the instance status changes to online, click
deploy in the app1 Actions column. Deploys are done as part of instance setup too, so any new instance will automatically have the application deployed during the bootstrap process.
After the application has deployed you can see the data by selecting
Instances and clicking on the instance’s public IP address to run the app, which displays the custom JSON that you entered earlier. You can change the custom JSON and deploy the app again, and you will see the new data.
You may be wondering why we attached the recipe to the “deploy” event. For more information about OpsWorks lifecycle events, please see the
documentation.
The aws-sdk.rb recipe
The aws-sdk.rb recipe calls the Amazon SNS service to create a topic. However, a recipe can’t just call any AWS service, it has to have permission. You will first need to create an IAM role that grants recipes and apps running on your OpsWorks instances permission to access the required services that are used by the recipe. See the
documentation for more information about specifying permissions for apps running on Amazon EC2 instances.
To create a role:
- Open the AWS IAM console and select Roles.
- Click on the aws-opsworks-ec2-role (which is the default role your instances use) and under Role Policies click Attach Role Policy.
- Scroll through the list, select the Amazon SNS Full Access policy, and apply it to the role.
To run the recipe, in the OpsWorks console:
- Select Stack in the navigation pane.
- Click the Run Command button.
- Select execute recipes on the Command menu.
- In the Recipes to execute box type sample::aws-sdk.
- Click the Execute Recipes button.
Once the command completes, navigate to the
Amazon SNS console and you will see the topic “watcher” was created.
The bash.rb recipe
To run the bash.rb recipe
- Go back to the Stack page and click the Run Command button.
- Select execute recipes on the Command menu.
- In the Recipes to execute box type sample::bash.
- Click the Execute Recipes button.
If you SSH to the instance you will see that the system greeting is set to the value defined in the recipe. For information on how to SSH to instances, please see the
documentation.
Summary
These three recipes are intended as a simple introduction to what’s possible with OpsWorks. As you begin to customize recipes you may want tools to help you diagnose problems. Please see the
documentation for common troubleshooting steps. There are many community resources that can help you learn Chef and implement your own customization and automation. Please use the
OpsWorks forums to ask questions or let us know what you need.