AWS Big Data Blog
Getting HBase Running on Amazon EMR and Connecting it to Amazon Kinesis
Wangechi Doble is an AWS Solutions Architect
Introduction
Apache HBase is an open-source, column-oriented, distributed NoSQL database that runs on the Apache Hadoop framework. In the AWS Cloud, you can choose to deploy Apache HBase on Amazon Elastic Compute Cloud (Amazon EC2) and manage it yourself or leverage Apache HBase as a managed service on Amazon Elastic MapReduce (Amazon EMR). Amazon EMR is a fully managed, hosted Hadoop framework on top of Amazon EC2. This post shows you how to launch an Apache HBase cluster on Amazon EMR using the AWS SDK for Java and how to extend the Amazon Kinesis Connector Library to stream data in real-time to HBase running on an Amazon EMR cluster. Amazon Kinesis is a fully managed service for real-time processing of streaming big data.
Launching an Amazon EMR Cluster with HBase
We will use the AWS SDK for Java in this post to launch an Amazon EMR cluster with HBase. To learn more about launching Apache HBase on Amazon EMR, see the documentation for installing HBase on an Amazon EMR Cluster section of the Amazon EMR documentation.
The Java code snippet below shows how to capture cluster configuration information using method chaining.
RunJobFlowRequest request = new RunJobFlowRequest()
   .withAmiVersion(amiVersion)
   .withBootstrapActions(new BootstrapActionConfig()
           .withName("Install HBase")
           .withScriptBootstrapAction(new ScriptBootstrapActionConfig()
           .withPath("s3://elasticmapreduce/bootstrap-actions/setup-hbase")))
   .withName("Job Flow With HBAse Actions")
   .withSteps(new StepConfig()
            //enable debugging step
           .withName("Enable debugging")
           .withActionOnFailure("TERMINATE_CLUSTER")
           .withHadoopJarStep(new StepFactory().newEnableDebuggingStep()),
           //Start HBase step –
           createStepConfig("Start HBase",
                            "TERMINATE_CLUSTER",
                            "/home/hadoop/lib/hbase.jar",
                            getHBaseArgs()),
           //add HBase backup step
           createStepConfig("Modify backup schedule",
                            "TERMINATE_JOB_FLOW",
                            "/home/hadoop/lib/hbase.jar",
                            getHBaseBackupArgs()))
   .withLogUri(logUri)
           .withInstances(new JobFlowInstancesConfig()
           .withEc2KeyName(keypair)
           .withInstanceCount(numberOfNodes)
           .withKeepJobFlowAliveWhenNoSteps(true)
           .withMasterInstanceType(masterInstanceType)
           .withSlaveInstanceType(coreInstanceType));
The RunJobFlowRequest class acts as a container for all the configuration information that you need to create and run a new job flow. When you launch an Amazon EMR cluster, the AMI version that you select will determine your HBase and Hadoop versions. (Amazon EMR documentation explains more about HBase versions and Hadoop versions). For Hadoop 2 and recent versions of HBase, choose an AMI version 3.0 or newer. Although bootstrap actions are optional, in this example we define a bootstrap action to install HBase along with the location of the script needed to accomplish that task.
Next, we configure three steps on this cluster. The first step enables debugging on this cluster and we specify an Amazon S3 bucket to collect logs that the cluster generates. The second and third steps are specific to HBase itself. These steps specify parameters to launch HBase and configure a backup schedule. We do not install additional software on this cluster. However, if you needed to install additional software like Ganglia to monitor your HBase cluster, for example, you would configure an additional step here.
We configure Amazon EC2 instance type information for this job flow in the final part of the code snippet. Here, we specify the total node count; master and slave nodes instance types along with an Amazon EC2 Key pair to connect to the master node using SSH. We also set the JobFlowInstancesConfig KeepJobFlowAliveWhenNoSteps parameter to TRUE so that the job flow transitions to the WAITING state rather than shutting down once the steps have completed.
To launch your cluster, you will need to provide the AmazonElasticMapReduceClient with an endpoint for Amazon EMR web service along with your access key and secret keys as follows:
AmazonElasticMapReduceClient emrClient = new  AmazonElasticMapReduceClient(config.AWS_CREDENTIALS_PROVIDER);
emrClient.setEndpoint(config.EMR_ENDPOINT);
You can now launch your cluster by executing the following:
RunJobFlowResult result = client.runJobFlow(request);
Once your Amazon EMR cluster launches, you can monitor its progress in the Amazon EMR management console. The cluster identifier becomes available as the cluster starts up. You will need the cluster identifier to access the master node in a later section of this post.
Connecting to HBase
Once your Amazon EMR cluster is available, you can connect to the master node using SSH as described here. Enter the following AWS EMR CLI command to connect to the master node:
$aws emr ssh –cluster-id j-xxxxxxxxxxxxx –key-pair-file /path/to/pem/file
In this post, we will use the HBase Rest API to load data. Once you successfully SSH into the master node, enter the following command to start the HBase Rest Server.
$hbase/bin/hbase rest start
The HBase Rest server runs on Port 8080 as shown in the following log output:

You must modify ElasticMapReduce-master, your cluster’s master node security group to allow traffic on port 8080. For more information, see Amazon EC2 Security Groups.
Once you’ve configured your master node security group, the next step is to configure your proxy settings. These settings allow you to view websites hosted on the master node. You must set up an SSH tunnel to the master node using dynamic port forwarding. You can use the AWS Command Line Interface (CLI) to set up the SSH tunnel as follows:
$aws emr socks –cluster-id j-xxxxxxxxxxxxx –key-pair-file /path/to/pem/file
To verify that your proxy settings and your SSH tunnel are both configured correctly, you should be able to successfully point your browser to your cluster’s master node public DNS on port 8080 without getting an error. If you get a blank page, everything is set up correctly.

Before your start loading data into HBase, you can launch the HBase shell via the master node as follows:
$hbase shell
To verify that no tables exist in your newly launched cluster, you can type the list command in the HBase shell as follows:
hbase(main)>list
You should get confirmation that there are no tables in your newly launched HBase cluster as follows:.

Extending the Kinesis Connector Library to Connect Amazon Kinesis to HBase
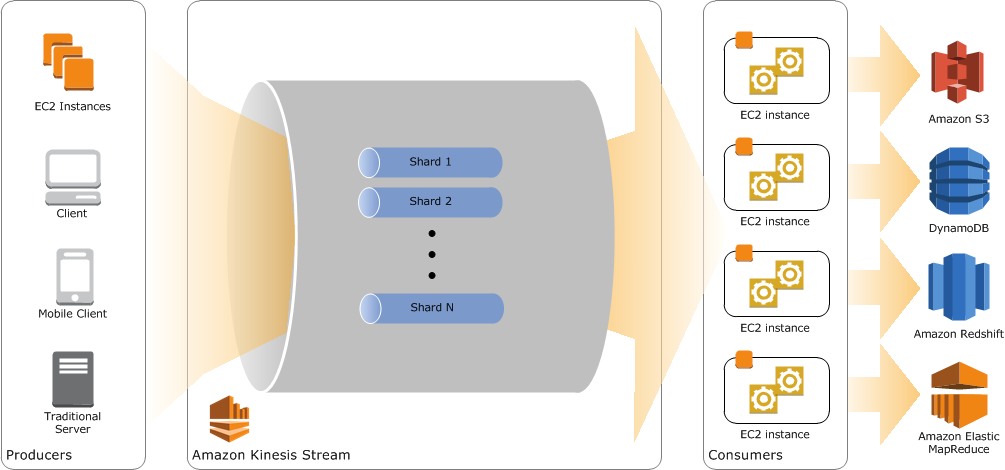
Next, we will leverage Amazon Kinesis to ingest data and emit the processed data to HBase running on Amazon EMR in real time. To learn more about how to build Amazon Kinesis applications, see Getting Started with Amazon Kinesis documentation. Below is the high-level architecture for HBase on Amazon EMR real-time data loading with Amazon Kinesis.

The Amazon Kinesis Connector Library is a customizable Java library that you can use to connect Amazon Kinesis with other AWS services and non-AWS processing frameworks. The connector library extends the Amazon Kinesis Client Library (Amazon KCL), an open-source client library that enables you to easily consume and process data from Amazon Kinesis.
A Kinesis connector application is essentially a pipeline that determines how records from an Amazon Kinesis stream are handled. Below is a high-level diagram of an Amazon Kinesis connector pipeline workflow:

An Amazon Kinesis connector application first retrieves records from an Amazon Kinesis stream then performs the following steps:
- Transforms records according to a user-defined data model or the target destination.
- Passes the data through a filter which allows you to specify whether to keep a subset of the records.
- Places the data in a buffer that allows you to define a system for batching or aggregating a set of records streamed through Amazon Kinesis to be processed later.
- Emits the results to the appropriate target destination.
When you create an Amazon Kinesis connector application, your connector application must:
- Provide concrete implementations of ITransformer, IFilter, IBuffer, and IEmitter interfaces.
- Implement the IKinesisConnectorPipeline interface.
- Extend the KinesisConnectorExecutorBase class to allow you to pass your application configuration information and AWS credentials to the client library.
In this post, we will leverage the samples that come with the connector library to create a connector that integrates HBase with Amazon Kinesis. We will use users.txt, a canned JSON dataset that comes with the samples, as our input data. This dataset forms the basis of the KinesisMessageModel.
First, we define a schema with four column families; namely, user, address, contact, and likes, because we want to support a flexible access pattern. Grouping related data into column families can optimize your queries. For example, if you want to retrieve contact information and nothing else, you can issue a query that retrieves data from the contact column family only. Following is a code snippet showing how to create a table in HBase using the HBase Rest API based on our data model:
Configuration config = HBaseConfiguration.create();
RemoteAdmin admin = new RemoteAdmin(new Client(new Cluster()
                        .add(dnsId, hbaseRestPort)), config);
String [] families = {"user", "address", "contact", "likes"};
try {
      ....
      admin.createTable(tableDesc);
      ....
} catch (IOException e) {
     LOG.error(e, e.getCause());
}
You can find the full listing in HBaseUtils.java.
The next step is to implement your custom Amazon Kinesis connector pipeline. Following is our example HBase pipeline:
@Override
public IEmitter> getEmitter(..) {
        return new HBaseEmitter(configuration);
}

@Override
public IBuffer  getBuffer (...) {
        return new BasicMemoryBuffer(configuration);
}

@Override
public ITransformer> getTransformer (...) {
        return new KinesisMessageModelHBaseTransformer();
}

@Override
public IFilter getFilter(...) {
        return new AllPassFilter();
}
You can find the full listing in HBasePipeline.java.
In our example HBase connector pipeline, KinesisMessageModelHBaseTransformer is our custom transformer responsible for transforming the KinesisMessageModel into a format compatible with HBase. In this example, our transformer transforms users.txt records from JSON to key/value pairs. Following is a code snippet of KinesisMessageModelHBaseTransformer:
Map item = new HashMap();
item.put("userid", Integer.toString(message.userid));
item.put("username", message.username);
item.put("firstname", message.firstname);
In this post, we leverage buffer and filter implementations that come with Amazon Kinesis connector library:
- AllPassFilter – allows all records to be processed and emitted to HBase.
- BasicMemoryBufferBuffer – buffers a transformed data in batches.
You can configure your buffer to trigger a buffer flush based on the following configurable conditions:
- Number of records
- Total byte count
- Time since last flush
You can configure these properties in a properties file:
# Flush when buffer exceeds 8 Kinesis records, 1 KB size limit or when time since last emit exceeds 10 minutes
bufferSizeByteLimit = 1024
bufferRecordCountLimit = 8
bufferMillisecondsLimit = 600000
As expected, in this post we define a custom emitter to emit processed data into HBase. HBaseEmitter is our custom emitter that we use to insert data that conforms with our schema into HBase. We use a put operation defined in the RemoteHTable class to write to HBase. Following is a code snippet of the HBaseEmitter class:
//start with the row key followed by column family
batch.add(new Put(Bytes.toBytes(hashMap.get("username")))
     .add(Bytes.toBytes("user"),
          Bytes.toBytes("userid"),
          Bytes.toBytes(hashMap.get("userid"))));
You can find the full listing in HBaseEmitter.java.
The last class to create is HBaseExecutor.java to execute our pipeline. Below is our example HBaseExecutor:
public HBaseExecutor(String configFile) {
        super(configFile);
    }
We pass our application configuration information to the HBaseExecutor constructor. For example, if you want to reuse an existing cluster rather than creating a new cluster each time you run this example, you can add your existing cluster id as an application property in EMRHBase.properties file:
#provide an EMR cluster Id if you already have a cluster running
emrClusterIdentifier = j-xxx
In this class, we also pass a reference to our pipeline along with the KinesisMessageModel to the KinesisConnectorRecordProcessorFactory.
@Override
public KinesisConnectorRecordProcessorFactory> getKinesisConnectorRecordProcessorFactory() {
     return new
         KinesisConnectorRecordProcessorFactory>(new HBasePipeline(), config);
}
This factory is responsible for instantiating a KinesisConnectorRecordProcessor that integrates with the Amazon KCL through the IRecordProcesor. The record processor is ultimately responsible for reading data from an Amazon Kinesis stream and managing your pipeline. Below is a class diagram of the KinesisConnectorRecordProcessor:

When you execute HBaseExecutor, you can confirm that indeed a table is created by running the list command in the HBase shell:
hbase(main)>list
The output from the list command indicates the existence of kinesisdata table:

You can issue the count command on the kinesisdata table repeatedly to see the number of rows in table increasing in real-time as more data is inserted by the HBaseEmitter:
hbase(main)>count
The following output indicates that table rows are increasing in real-time:

Here’s the count output as thousands of records are inserted into HBase:

You can issue the get command to retrieve a row based on a username:
hbase(main)>get ‘kinesisdata’,’ALS58LAT’
Below is the resulting output from the get command:

Conclusion
In summary, in this post we learned how to launch HBase on Amazon EMR using the AWS SDK for Java. We also learned how to extend the Kinesis Connector Library to connect Amazon Kinesis to HBase. We then used our HBase connector for Amazon Kinesis to load data into HBase in near real-time using the HBase Rest API.
While this example uses a canned dataset to demonstrate HBase on Amazon EMR real-time data loading with Amazon Kinesis, you can build upon this sample application to process streaming data in real-time from sources such as website clickstreams, social media feeds, application logs, and more. In addition, you can enhance your HBase Kinesis-enabled application to power real-time dashboards, generate alerts, and even yield dynamic visualizations based on your use case.
You can access the complete sample code with instructions on how to configure, build, and execute this sample application.
If you have any questions or suggestions, please add a comment below.
Do more with Amazon Kinesis!
Hosting Amazon Kinesis Applications on AWS Elastic Beanstalk
Snakes in the Stream! Feeding and Eating Amazon Kinesis Streams with Python
—————————————————————
Love to work on open source? Check out EMR’s careers page.
—————————————————————-